I just finished the recipe journal swap that I signed up for on Swap-bot. With this swap you have to send your assigned partner a notebook or journal of some form that has 50 hand wrote recipes in it. I decided that I wanted to make the journal for my partner a little bit special so I took an tutorial that I found on MayMayMadeIt and used her ideas to make my journal extra special. I really really love the paper that I used to decorate this journal and I will include links at the end of this blog post on where you can find this paper pack if you wish to purchase it for yourself. I will also link the MayMay's tutorial at the end so you can go and check out her youtube channel. She is totally wonderful and awesome and I've learned so many crafty things by watching her videos. You should really check her out and subscribe to her if you've not heard of her before. Now on to the photos of the journal I created for my swap partner, BrooklyBunch. I am hoping she will like this and appreciate all the hard work I put into making it for her.
Funny story though, I first started out this journal swap just writing random recipes in a notebook then decided I wanted to separate them all into categories, so I started over again. Then once I had a bunch of recipes in the notebook I decided I wanted to add Tabs and such to make it easier to look through, so I added all that. Then I stumbled upon MayMay's tutorial and decided to order the paper pack she showed so I could decorate the journal. While I was waiting for the paper to show up I decided to finish writing out the recipes. But when I got to the end of the notebook I realized that I loved most of these recipes and I liked having them written down and on hand instead of stored online that I decided to keep the original (second one..lol) for myself and start totally fresh with the journal for a THIRD time. The pictures you see below are my final project that I will mail out to BrooklyBunch. I hope you like what I've made! Enjoy!
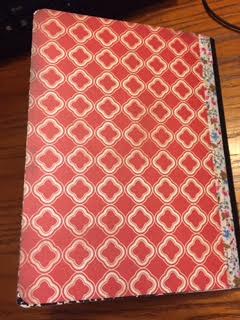

I wanted a simple cover. One that was pretty but at the same time not too frufru. I just layered a couple layers of the pattern paper from the paperpack and then used one of the cut outs from the kit as the main image of the book. I did the same thing with the back cover and used another pretty pattern. For the spine of the book I didn't want to cover it and cause problems when trying to flip through the book so I just decided to use some sticky back fabric tape to cover the seam between the front cover and and the spine of the composition notebook. Then I added a pretty sequin ribbon to the the front to add to the look. (see close up of sequin ribbon below)


I also made these cool tabs dividers using my WeRMemoryKeepers envelope punchboard. This is something I learned from maymay's video. (see very end of blog for tutorial).

I covered both the inside and back cover with plain white cardstock, thereby covering up all the conversion charts that you normally see in the inside covers of all composition notebooks. I then added a pocket to both the front and back covers to give my swap partner a place to tuck in random things. There are several pockets throughout the journal that can be used for storing more recipes and whatever else Susan may wish to add to this to make it her own.


Using the patterned paper from the paperpack I decorated both the front and back of every divider. Some have pockets for tucking items and some are just accented with the matching stickers from the kit. The below picture of the Table of Contents, I used my label maker to add the page numbers to ever page and on the Table of Contents page. The camera actually added a glare to the labels but seeing them with your normal eye, they actually blend into the page. I also used my label maker to for all the tab descriptions.


Several of the pockets contain tags that also came from the paper packet and I added them to the pockets with the thought that Susan could add her own recipes to these cards or maybe pictures of things she's cooked.


I hand wrote all the recipes in the journal. I thought it added a more personal touch and I am hoping that she will be able to read my handwriting. hahahhha I tried to take my time when writing everything out so that it didn't look chicken scratchy. :) I did switch back and forth between printing and cursive and I changed pen colors several times to keep things interesting.


At the end of the recipe journal I had several pages left over that I didn't want to leave blank. After I added the Index to the very back of the notebook I decided to look up and include several ingredient substitution pages and also a Measurement Equivalent chart. I thought these things would be handy to keep in print where you wouldn't have to look them up. Things like what is a dash or pinch equivalent to in actual measurements. lol


The paper pack that I bought for this project is called: " Home Sweet Home" by Carina Gardner and is created by Carta Bella paper company. It is a whole scrapbooking kit and came with 12 double sided 12x12 heavy cardstock papers and a couple pages of cutouts. One being the recipe cards that I used at pockets and the second cut apart page being the tags that I used throughout the journal and put in the pockets I created. You also get a 12x12 page of element stickers that you can see from above that I used as embellishments throughout the whole journal.
I purchased this paper pack off of Amazon for $9.98 and you can find it by clicking the below link.
The tutorial that I used for inspiration to make this recipe journal I found on MayMayMadeIt's youtube channel. Below you can find the link to take you to part one of the tutorial. From there you can find parts two and three.
No comments:
Post a Comment